Was this page helpful?
Migrate from DynamoDB to ScyllaDB Alternator Using Docker
In this tutorial, you will replicate 1,000,000 items from a DynamoDB table to ScyllaDB Alternator.
All the scripts and configuration files shown on the tutorial can be found in our GitHub repository.
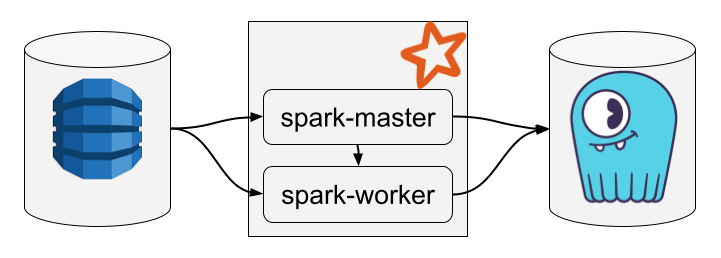
The whole system is composed of the DynamoDB service, a Spark cluster with a single worker node, and a ScyllaDB cluster with a single node, as illustrated below:
To follow this tutorial, you need to install Docker and the AWS CLI.
Set Up the Services and Populate the Source Database
In an empty directory, create the following docker-compose.yaml file to define all the services:
services:

  dynamodb:
    command: "-jar DynamoDBLocal.jar -sharedDb -inMemory"
    image: "amazon/dynamodb-local:2.5.2"
    ports:
      - "8000:8000"
    working_dir: /home/dynamodblocal

  spark-master:
    image: ${SPARK_IMAGE:-spark-migrator}
    build: dockerfiles/spark
    command: master
    environment:
      SPARK_PUBLIC_DNS: localhost
    ports:
      - 4040:4040
      - 8080:8080
    volumes:
      - ./spark-data:/app

  spark-worker:
    image: ${SPARK_IMAGE:-spark-migrator}
    build: dockerfiles/spark
    command: worker
    environment:
      SPARK_WORKER_CORES: 2
      SPARK_WORKER_MEMORY: 4G
      SPARK_WORKER_WEBUI_PORT: 8081
      SPARK_PUBLIC_DNS: localhost
    ports:
      - 8081:8081
    depends_on:
      - spark-master

  scylla:
    image: scylladb/scylla:6.0.1
    expose:
      - 8001
    ports:
      - "8001:8001"
    command: "--smp 1 --memory 2048M --alternator-port 8001 --alternator-write-isolation only_rmw_uses_lwt"
Let’s break down this Docker Compose file.
We define the DynamoDB service by reusing the official image
amazon/dynamodb-local. We use the TCP port 8000 for communicating with DynamoDB.We define the Spark master and Spark worker services by using a custom image (see below). The image installs Spark 4.0.2, matching the Spark version required by Migrator 2.x. We mount the local directory
./spark-datato the Spark master container path/appso that we can supply the Migrator jar and configuration to the Spark master node. We expose the ports 8080 and 4040 of the master node to access the Spark UIs from our host environment. We allocate 2 cores and 4 GB of memory to the Spark worker node. As a general rule, we recommend allocating 2 GB of memory per core on each worker.We define the ScyllaDB service by reusing the official image
scylladb/scylla. We use the TCP port 8001 for communicating with ScyllaDB Alternator.
Create the Dockerfile required by the Spark services at path ./dockerfiles/spark/Dockerfile and write the following content:
FROM alpine:3.20

ENV SPARK_VERSION=4.0.2 \
    HADOOP_VERSION=3 \
    SPARK_HOME="/spark"

RUN set -ex; \
    apk add --no-cache openjdk17-jre bash rsync procps openssh coreutils; \
    wget https://archive.apache.org/dist/spark/spark-${SPARK_VERSION}/spark-${SPARK_VERSION}-bin-hadoop${HADOOP_VERSION}.tgz; \
    tar --directory / -xvzf spark-${SPARK_VERSION}-bin-hadoop${HADOOP_VERSION}.tgz; \
    mv /spark-${SPARK_VERSION}-bin-hadoop${HADOOP_VERSION} ${SPARK_HOME}; \
    rm spark-${SPARK_VERSION}-bin-hadoop${HADOOP_VERSION}.tgz

ENV PATH="${SPARK_HOME}/sbin:${SPARK_HOME}/bin:${PATH}"

WORKDIR ${SPARK_HOME}

COPY entrypoint.sh .
ENTRYPOINT ["/spark/entrypoint.sh"]
This Dockerfile installs Java and a Spark distribution. It uses a custom shell script as entry point. Create the file ./dockerfiles/spark/entrypoint.sh, and write the following content:
#!/bin/bash

export SPARK_NO_DAEMONIZE=true

if [ "$1" == "master" ]
then
  echo "Starting a Spark master node"
  start-master.sh
elif [ "$1" == "worker" ]
then
  echo "Starting a Spark worker node"
  start-worker.sh spark://spark-master:7077
else
  echo "ERROR: Please call the entrypoint with argument 'master' or 'worker'"
  exit 1
fi
The entry point takes an argument that can be either master or worker to control whether to start a master node or a worker node.
Prepare your system for building the Spark Docker image with the following commands, which create the spark-data directory and make the entry point executable:
mkdir spark-data
chmod +x entrypoint.sh
Finally, start all the services with the following command:
docker compose up
Your system’s Docker daemon will download the DynamoDB and ScyllaDB images and build your Spark Docker image.
Check that you can access the Spark cluster UI by opening http://localhost:8080 in your browser. You should see your worker node in the workers list.

Once all the services are up, you can access your local DynamoDB instance and your local ScyllaDB instance by using the standard AWS CLI. Make sure to configure the AWS CLI as follows before running the dynamodb commands:
# Set dummy region and credentials
aws configure set region us-west-1
aws configure set aws_access_key_id dummy
aws configure set aws_secret_access_key dummy
# Access DynamoDB
aws --endpoint-url http://localhost:8000 dynamodb list-tables
# Access ScyllaDB Alternator
aws --endpoint-url http://localhost:8001 dynamodb list-tables
The last preparatory step consists of creating a table in DynamoDB and filling it with random data. Create a file named create-data.sh, make it executable, and write the following content into it:
#!/usr/bin/env sh

# Create table
aws \
  --endpoint-url http://localhost:8000 \
  dynamodb create-table \
    --table-name Example \
    --attribute-definitions AttributeName=id,AttributeType=S \
    --key-schema AttributeName=id,KeyType=HASH \
    --provisioned-throughput ReadCapacityUnits=100,WriteCapacityUnits=100

# Add items in parallel
# Change 40000 into 400 below for a faster demo (10,000 items instead of 1,000,000)
seq 1 40000 | xargs --max-procs=8 --max-args=1 ./create-25-items.sh
This script creates a table named Example and adds 1 million items to it. It does so by invoking another script, create-25-items.sh, which uses the batch-write-item command to insert 25 items in a single call:
#!/usr/bin/env sh

generate_25_items() {
  local items=""
  for i in `seq 1 25`; do
    items="${items}"'{
      "PutRequest": {
        "Item": {
          "id": { "S": "'"$(uuidgen)"'" },
          "col1": { "S": "'"$(uuidgen)"'" },
          "col2": { "S": "'"$(uuidgen)"'" },
          "col3": { "S": "'"$(uuidgen)"'" },
          "col4": { "S": "'"$(uuidgen)"'" },
          "col5": { "S": "'"$(uuidgen)"'" }
        }
      }
    },'
  done
  echo "${items%,}" # remove trailing comma
}

aws \
  --endpoint-url http://localhost:8000 \
  dynamodb batch-write-item \
    --request-items '{
      "Example": ['"$(generate_25_items)"']
    }' > /dev/null
Every added item contains an id and five columns, all filled with random data.
Run the script ./create-data.sh and wait for a couple of hours until all the data is inserted (or change the last line of create-data.sh to insert fewer items).
Perform the Migration
Once you have set up the services and populated the source database, you are ready to perform the migration.
Download the latest stable release of the Migrator in the spark-data directory:
wget https://github.com/scylladb/scylla-migrator/releases/latest/download/scylla-migrator-assembly.jar \
  --directory-prefix=./spark-data
Create a configuration file in ./spark-data/config.yaml and write the following content:
source:
  type: dynamodb
  endpoint:
    host: http://dynamodb
    port: 8000
  region: us-west-1
  credentials:
    accessKey: dummy
    secretKey: dummy
  table: Example

target:
  type: alternator
  endpoint:
    host: http://scylla
    port: 8001
  region: us-west-1
  credentials:
    accessKey: dummy
    secretKey: dummy
  table: Example
  streamChanges: false

savepoints:
  path: /app/savepoints
  intervalSeconds: 300
This configuration tells the Migrator to read the items from the table Example in the dynamodb service, and to write them to the table of the same name in the scylla service.
Finally, start the migration with the following command:
docker compose exec spark-master \
  /spark/bin/spark-submit \
    --executor-memory 4G \
    --executor-cores 2 \
    --class com.scylladb.migrator.Migrator \
    --master spark://spark-master:7077 \
    --conf spark.driver.host=spark-master \
    --conf spark.scylla.config=/app/config.yaml \
    /app/scylla-migrator-assembly.jar
This command calls spark-submit in the spark-master service with the file scylla-migrator-assembly.jar, which bundles the Migrator and all its dependencies.
In the spark-submit command invocation, we explicitly tell Spark to use 4 GB of memory; otherwise, it would default to 1 GB only. We also explicitly tell Spark to use 2 cores. This is not really necessary as the default behavior is to use all the available cores, but we set it for the sake of illustration. If the Spark worker node had 20 cores, it would be better to use only 10 cores per executor to optimize the throughput (big executors require more memory management operations, which decrease the overall application performance). We would achieve this by passing --executor-cores 10, and the Spark engine would allocate two executors for our application to fully utilize the resources of the worker node.
The migration process inspects the source table, replicates its schema to the target database if it does not exist, and then migrates the data. The data migration uses the Hadoop framework under the hood to leverage the Spark cluster resources. The migration process breaks down the data to transfer chunks of about 128 MB each, and processes all the partitions in parallel. Since the source is a DynamoDB table in our example, each partition translates into a scan segment to maximize the parallelism level when reading the data. Here is a diagram that illustrates the migration process:

During the execution of the command, a lot of logs are printed, mostly related to Spark scheduling. Still, you should be able to spot the following relevant lines:
24/07/22 15:46:13 INFO migrator: ScyllaDB Migrator 0.9.2
…
24/07/22 15:46:20 INFO alternator: We need to transfer: 2 partitions in total
24/07/22 15:46:20 INFO alternator: Starting write…
24/07/22 15:46:20 INFO DynamoUtils: Checking for table existence at destination
And when the migration ends, you will see the following line printed:
24/07/22 15:46:24 INFO alternator: Done transferring table snapshot
During the migration, it is possible to monitor the underlying Spark job by opening the Spark UI available at http://localhost:4040.
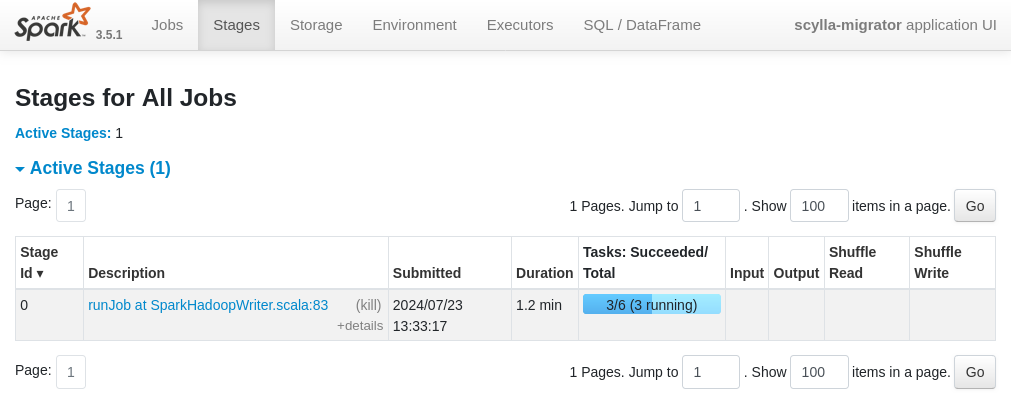
Example of a migration broken down in 6 tasks. The Spark UI allows us to follow the overall progress, and it can also show specific metrics such as the memory consumption of an executor.
In our example the size of the source table is ~200 MB. In practice, it is common to migrate tables containing several terabytes of data. If necessary, and as long as your DynamoDB source supports a higher read throughput level, you can increase the migration throughput by adding more Spark worker nodes. The Spark engine will automatically spread the workload between all the worker nodes.